DIY SONOS port / connect (IKEA symfonisk hack)
Connect your existing dumb speakers to your Sonos system for just 99€ with this IKEA Symfonisk mod. Transform the affordable Symfonisk speaker into a DIY Sonos Port alternative and enjoy studio-quality sound without breaking the bank. Perfect for budget-conscious audiophiles!
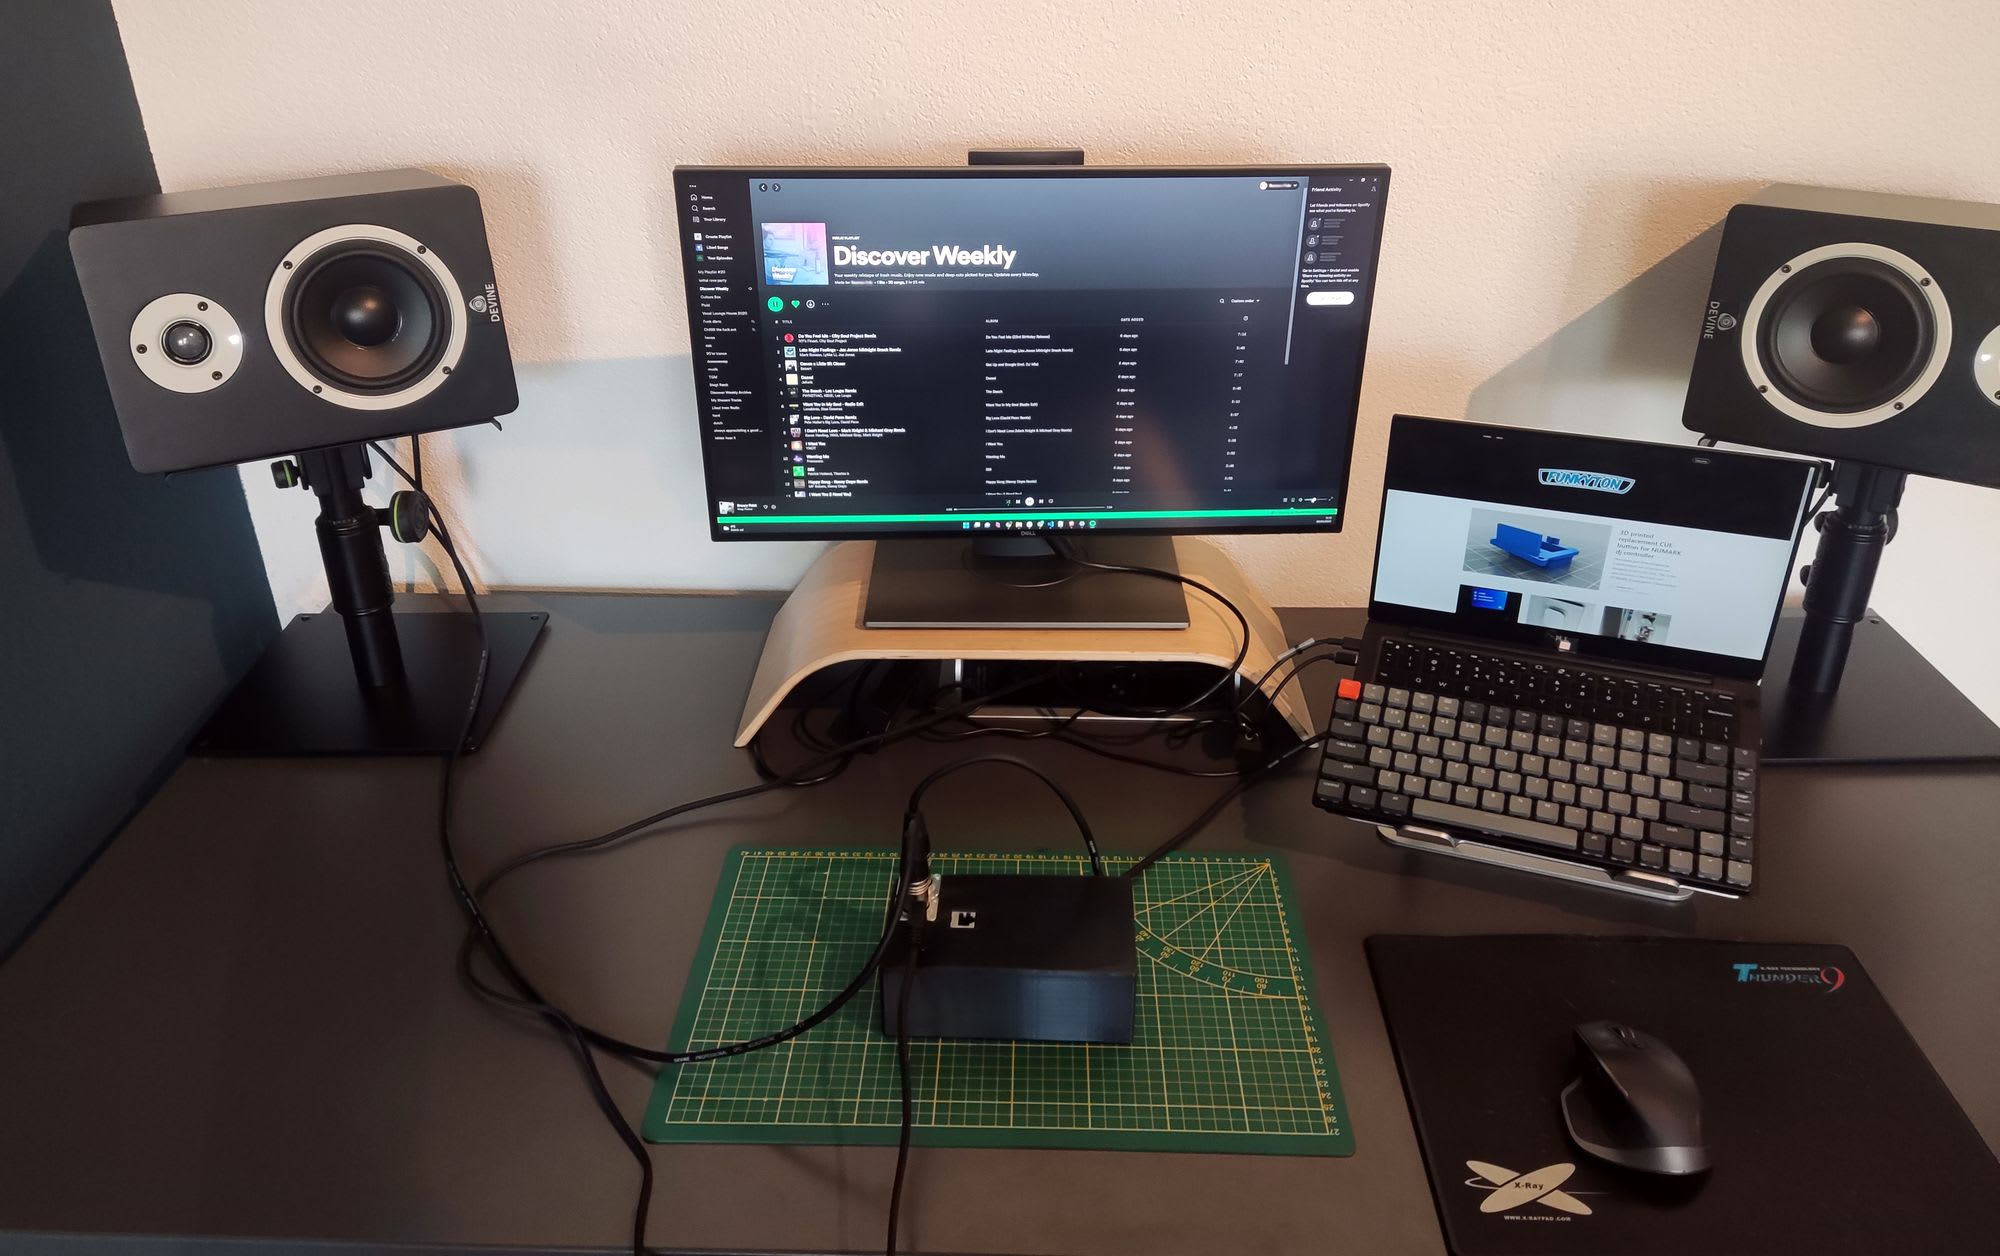
In this article I will cover how I connected my crisp sounding studio monitors to the rest of my SONOS system, and for the small price of 99€.
Disclaimer: You can easily break your symfonisk speaker by following this guide! And more importantly, you will be exposed to the danger of extremely high voltage capacitor that can shock you also when the board is not plugged in! Be careful!
First thing first, I am using the circuit board from the IKEA symfonisk speaker to to connect two active studio monitors via XLR. Unlike many other builds that uses the amplified output from the symfonisk module to drive passive speakers, I am using the non amplified signal, to connect my studio monitors since they have their own amplifiers - tuned to their drivers. This way I can add XLR speakers to my SONOS setup for the price of 99€, instead of 449€ that the SONOS port cost. Does this really work? The answer is "yes - but". I will cover my findings throughout this article.
Shopping list:
- IKEA symonisk speaker
- XLR male connector x 2
Prerequisite:
- 3d printer (optional, if reusing IKEA case)
- Soldering iron + solder
- Wires
- Tools to cut plastic (I used a dremel)
Download compact case: https://www.thingiverse.com/thing:5346807
Build guide
1: Disassemble symfonisk speaker
I found this video the very helpful.
After removing the front panel, unscrew all the electronics so that you are left with the circuit board only - but BE CAERFUL, there are 3 capacitors with massive charge in them, discharge them before touching the board further!! If you do not know what a capacitor is or how to discharge it, I wouldn't recommend you to attempt this modification, as it is simply too dangerous. Leave the heat sink in the IKEA speaker, we are not gonna need it since we are gonna be using the non amplified signal.
You need to apply quite a bit of force to break free the Wi-Fi antennas, they are held in place with double sided tape - we are gonna be needing them for later, just leave them connected to the main board. Also disconnect the front button panel, 4 small screws (be sure not to lose these screws they are very important later), the flat cable can be unmounted by lifting up the tiny black plate of top of it, then the cable can be lifted up.
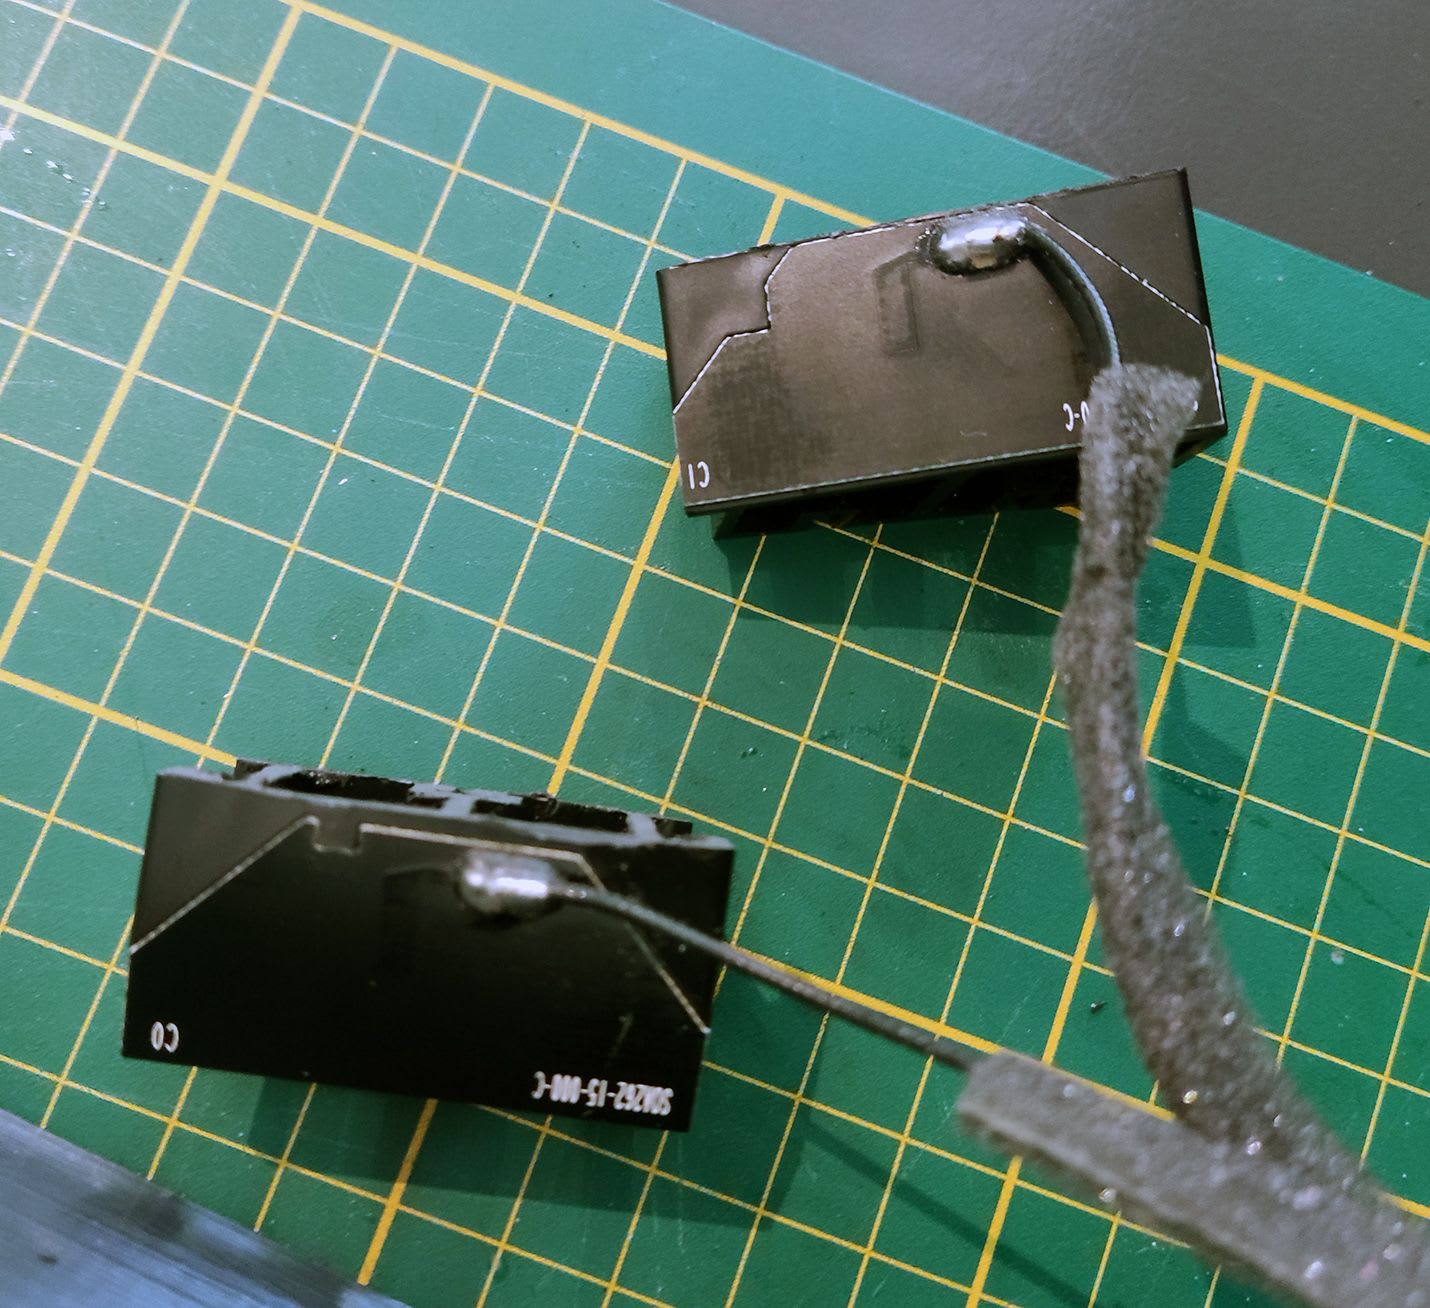
2: Solder wires to the non amplified sound signal
You are gonna need some very steady hands and a very pointy soldering iron, because the space you need to solder within is tiny! And by the way, this is the step where you might break your speaker if you do it wrong.
you are gonna need 3 wires, one for negative (I used yellow), one for low frequency out and one for the high frequency out (I used blue for these). Visit https://www.instructables.com/Cheaper-Sonos-Architectural-With-IKEA/ and scroll down to step 3: Solder to Board. This guy have very good high resolution images of the solder points.
Join the two lose ends of the (blue) high frequency and the (blue) low frequency wires so we get a joined full spectrum signal wire (blue).
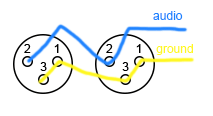
Next solder wires to your XLR connectors. Pin 1 and 3 is both ground, while pin 2 needs to be connected to the joined audio signal. I suggest wiring the XLR connectors in parallel leaving just one ground and one audio signal wire loose. This way, we easily can connect them with the lose wires from the mainboard after installing everything in the case.
3: The build
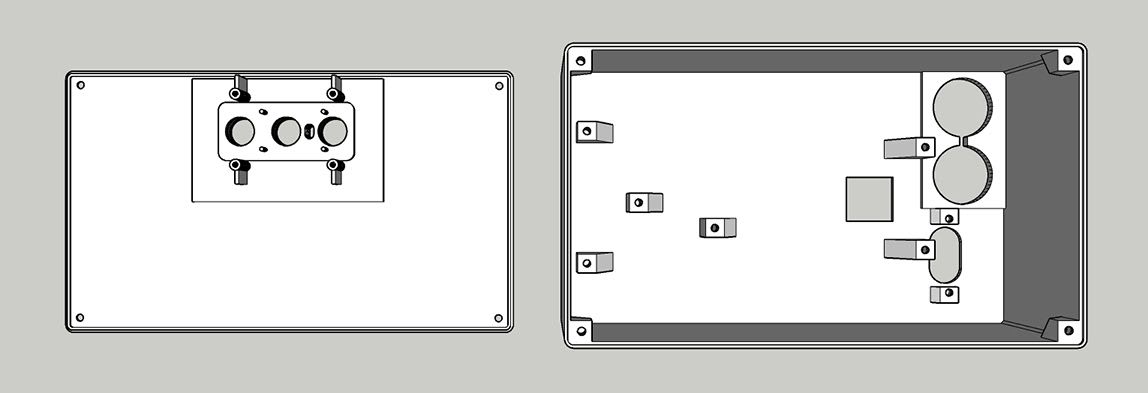
First print the container that I have designed for the purpose of this build, you can find it at thingiverse.com. I printed it on my ender 3 max.
If you do not have a 3d printer, you could simply put everything back in the IKEA symfonisk case and drill holes for the audio connectors.
First disconnect the flat cable from the button module, but keep it connect to the main board, it will be impossible to connect once the board is mounted in the box so keep it connected while you install the main board in the case. Use the same screws as were used to hold it in place in the IKEA enclosure.
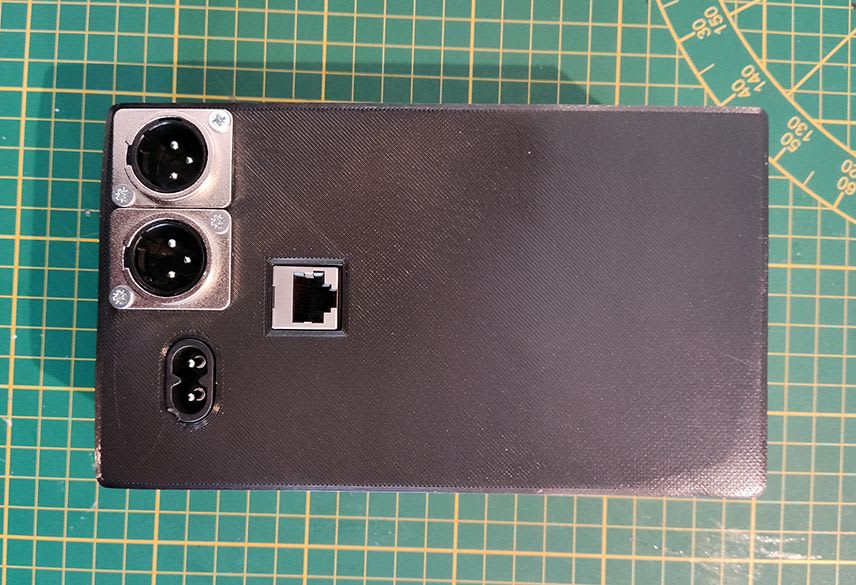
Now install the 220V power connecter in the oval whole right next to the main board. Use the same 2 screws as were used in the IKEA enclosure. Then connect it to the board.
Last but not least, insert the 2 XLR male connectors in the case, you can secure them with hot glue or screws, but if you decided to use screws, I would suggest that you drill holes in the case first.
Now the back is complete, but we still need to fit the Wi-Fi antennas, and install the front panel.
In order to fit the Wi-Fi antennas you need to cut away some of the plastic they are mounted to, otherwise they wont fit. They should look something like this:
Leave them like this while we focus on the front panel.
Install the button module on the front panel. Use the same 4 screws as were used in the IKEA enclosure. Then connect the flat cable from the main board to the button module.
Now connect the XLR ground wire (my yellow) to the ground wire you soldered to the main board, and then connect the audio signal wire (my blue) to the XLR audio wire.
Everything is now connected, use the following image as reference on how to fit everything back in the casing, I found no other way of fitting the Wi-Fi antennas.
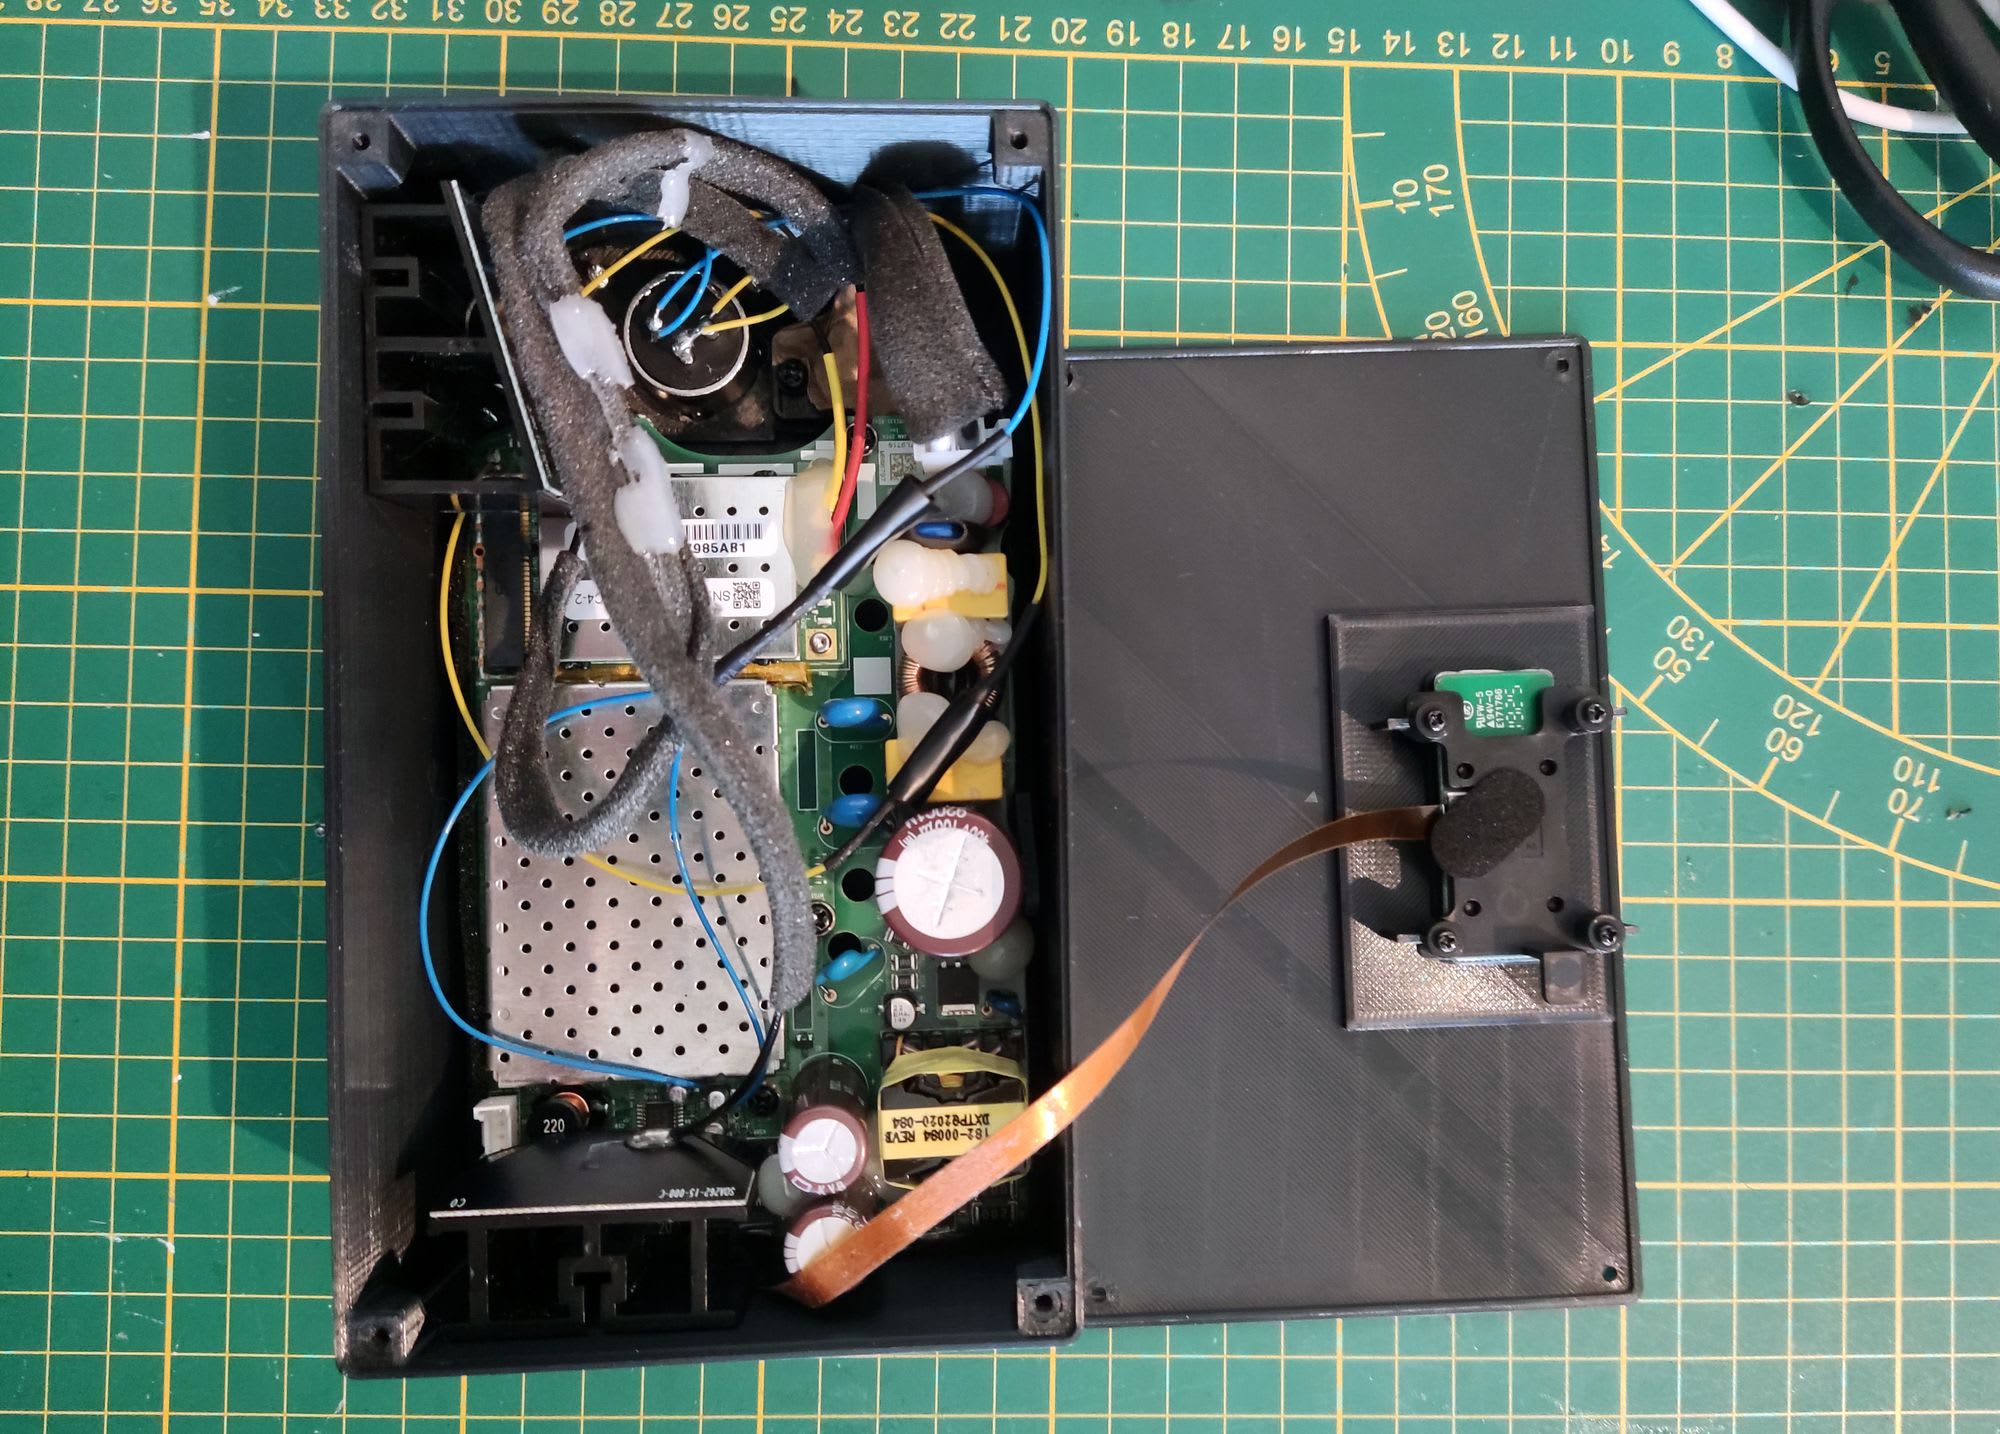
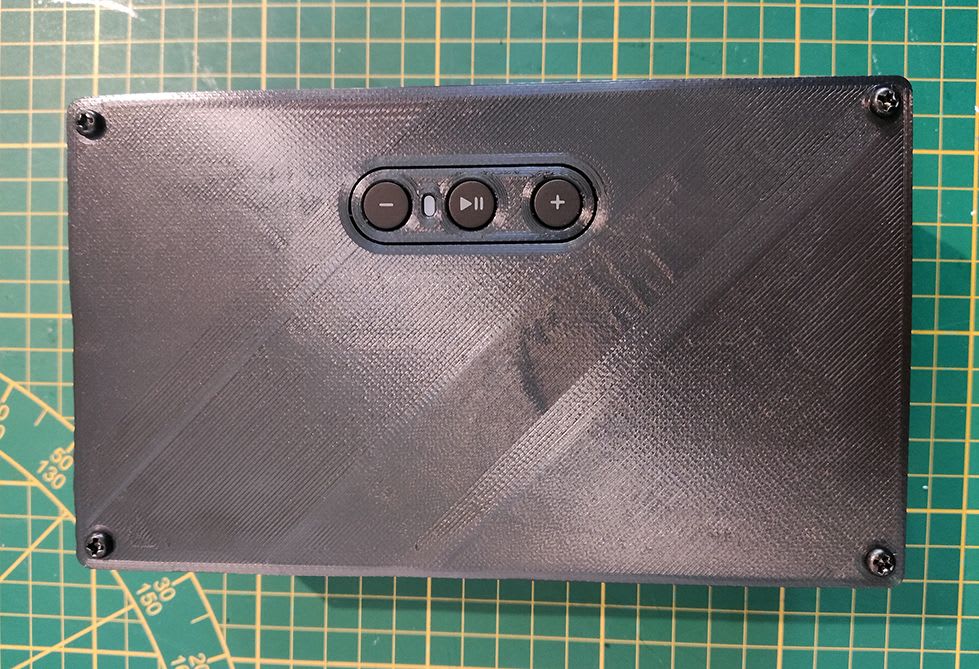
All you need to do now is to secure the front panel with 4 screws, I used excess screws from the symfonisk speaker.
The result
Now that the build is complete you can plug in your set of studio monitor or PA system - basically anything that uses XLR as audio interface can now be connected to your SONOS system with this box. Plug in the power cable and wait for it to connect to your Wi-Fi. It will of course still be recognized by the SONOS app as a symfonisk speaker. I renamed my speaker to "Studio monitors" in the app.
Does it work?
It definitely gets your speakers online, and capable of using along with all the other SONOS products, for just 99€. However, this setup turns a set of stereo speakers into a mono setup, so that's something to keep in mind. You could of course spend 2 x 99€ and build the box twice, then wire just one speaker to each box and setup a stereo pair in the SONOS app.
Sound quality?
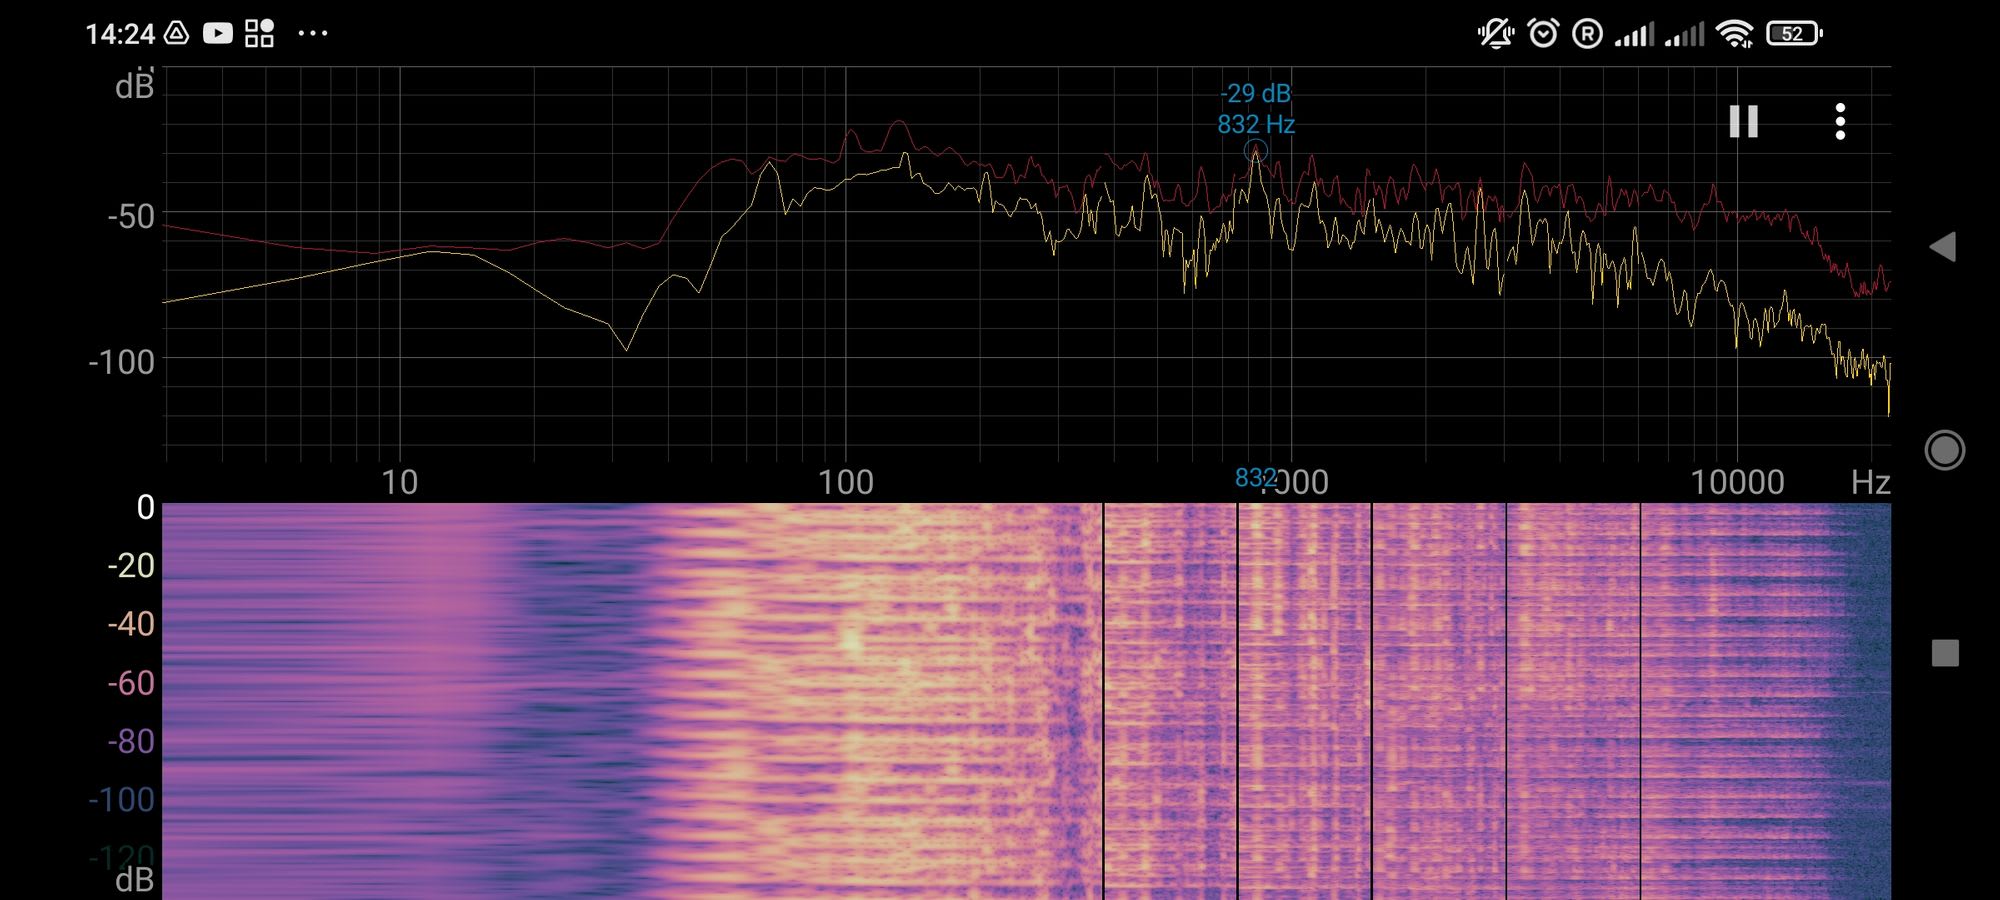
So I found that my studio monitors sounds much more deep when connected via this box than they usually do. So I think there might be some EQ going on before the signal is amplified, this is probably done to boost the bass of the symfonisk speaker. Here is a sound spectrogram of the studio monitors, and you can see they they are way too loud around the 125Hz frequencies.
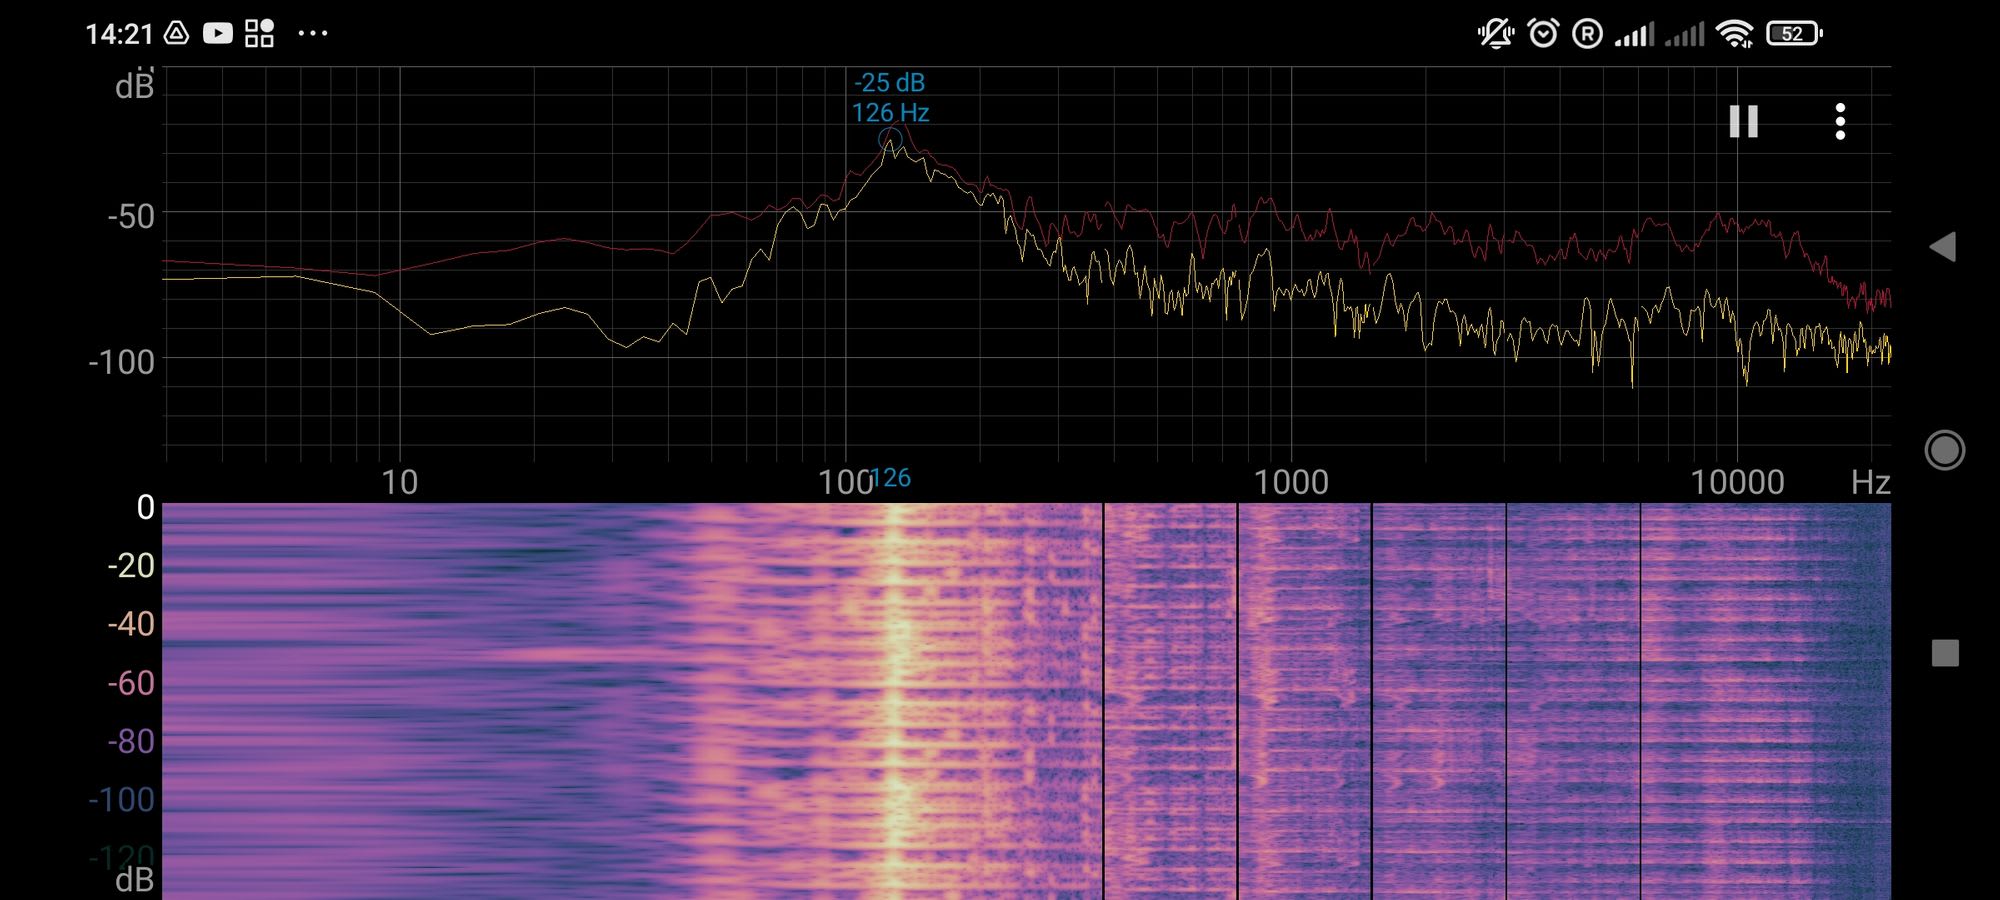
Compared to a spectrogram of the same song on my SONOS Beam (soundbar) which has a much nicer flat line.
I have tried to turn down the bass a little on in the SONOS app for the studio monitors, but it doesn't quite get the sound right. Unfortunately the app does not allow for advanced equalization, so I can't turn down the 125Hz area alone.
Conclusion
I will be using this setup when hosting house parties where sound quality is less important, and I will probably place the monitors in the garden and keep the real SONOS speakers in the house to have same music playing everywhere.
But unless there is a way to fine tune the EQ to get the sound just right, I will call this solution unfit for audiophiles. I was expecting much better sound quality, as the studio monitors are able to reproduce sound much more accurate than any of my SONOS speakers, but due to the spike around 125Hz the sound is less accurate than the SONOS speakers